Was ist das Besondere daran, das Halten einer Kamera zu lernen? Sie werden überrascht sein, was für einen großen Unterschied es machen kann. Wenn Sie Ihre Kamera richtig halten, können Sie komfortablere Aufnahmen und schärfere Bilder erzielen.
In our beginners classes, we observe that more than 99% of our students make at least one of the mistakes listed below. Do you? This might be the reason why you sometimes end up with blurry images or don’t feel so comfortable taking pictures.
Das allgemeine Prinzip besteht darin, dass Ihr linker Arm als Einbeinstativ fungiert und das Gewicht der Kamera trägt. Die rechte Hand hält die Kamera bequem und bewegt sich für vertikale Aufnahmen nach oben, während die linke Hand ruhig bleibt. Die linke Hand ändert den Zoom.
Je früher Sie gute Kamerahaltegewohnheiten entwickeln, desto besser. Es wird viel schwieriger sein, schlechte Gewohnheiten zu ändern, wenn Sie in der Fotografie Fortschritte machen.
If you already know how to hold a camera, check our recommendations article on choosing the right camera for beginners.
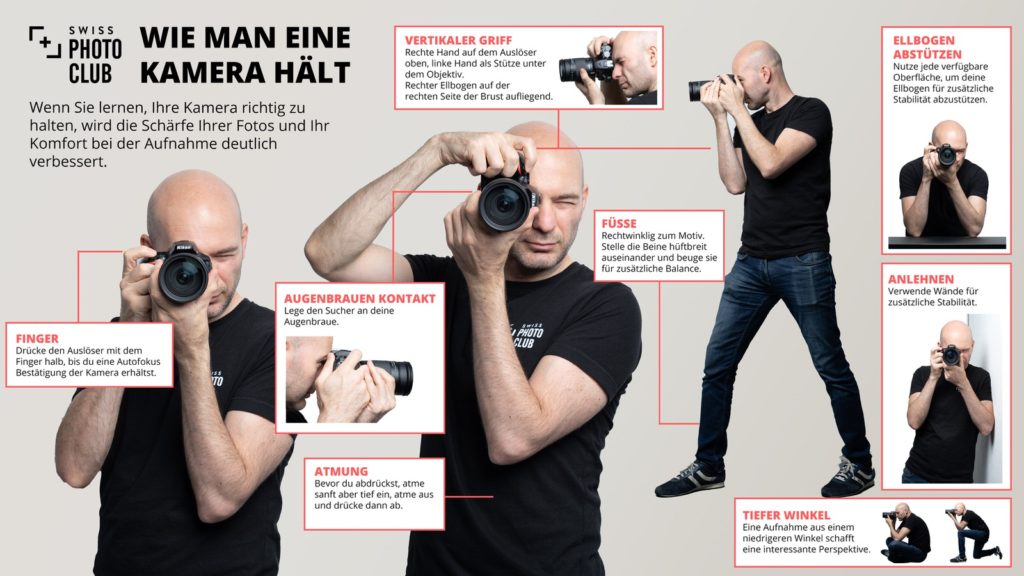
Infografik:

Möchten Sie dieses Bild teilen? Sie können dies tun, indem Sie diesen Code in Ihre Website kopieren / einfügen:
<p><strong>Please include attribution to Swiss Photo Club with this graphic.</strong><br /><br /><a href='https://blog.swissphotoclub.com/en/how-to-hold-a-camera-properly/'><img src='https://blog.swissphotoclub.com/wp-content/uploads/2020/05/How-to-hold-a-camera-en.jpg' alt='How to hold a camera' width='800px' border='0' /></a></p>How to hold a camera: 10 rules
Left hand below the lens, not on the side
Avoid the „butterfly position“! The most common mistake we see with beginners, as they try to hold a DSLR like a phone camera.
The left hand should hold the lens from underneath with the thumb facing out. Firm, but not too tight. The left elbow rests on the side of the chest for stability. Tuck your elbows.
Vertical grip: Hold your camera with your right hand up
To shoot vertically, position your shutter release up, with your right elbow up. Your left hand stays below and doesn’t move. 
Eyebrow contact
Resting the camera on your eyebrow (unless you’re wearing eyeglasses) will help the stability further by creating a third point of contact. 
Tuck your elbows, and use the viewfinder.
Keep your elbows tucked, so that your elbows are anchored to your chest. This stops the elbows from their natural shake and also allows you to move your left hand under the lens to give it more support. If your camera has a viewfinder, you will find that holding the camera to your face will make it easier to stabilize the setup.
Right hand index finger relaxed on the shutter
To take a picture, squeeze the shutter lightly until you feel the resistance. Wait there for the focus confirmation before full press. A light push is enough; there is no need to press too hard.
Feet apart, left side to your subject
With your side to your subject, you will be able to rest your left elbow to the left side of your chest. Keep your feet apart for additional balance.
Lean towards your subject
We are not sure exactly why, but many students tend to lean backwards while taking a photo. For better stability and for your subject not to feel that you’re shying away from them, have a stable stance and lean slightly forward towards your subject.
Exhale, then shoot
Take a breath, exhale, and then take the shot. The best time to take the shot is during what’s called the “respiratory pause.” This is when you’re done exhaling: the most stable moment.
Lower angles
While shooting from lower angles, use the opportunity to create extra support by resting your elbows on your knees. 
Use anything as a support
If there’s a wall, lean on it. If there’s a table, put your elbows on it. The more support you can create for your arms, the better.
Hoffe das hilft! Mit diesen neuen Gewohnheiten werden Sie schärfere Bilder machen und sich nach einem langen Drehtag viel besser fühlen.
Now that you know how to hold your camera correctly, go ahead and check our article on how to learn photography. Or you can skip straight ahead to checking out our in-person photography courses.